There is nothing better than a Thanksgiving dinner with tons of family and loved ones, but not everyone is able to travel or has the opportunity to spend time with their families.
You can still enjoy a classic Thanksgiving meal on a smaller scale if for some reason you find yourself alone or celebrating Thanksgiving with one other person.
To make it easier for you to enjoy all those delicious thanksgiving recipes without having to put on a big production, I have created this smaller-sized meal that can be prepared in about two hours.
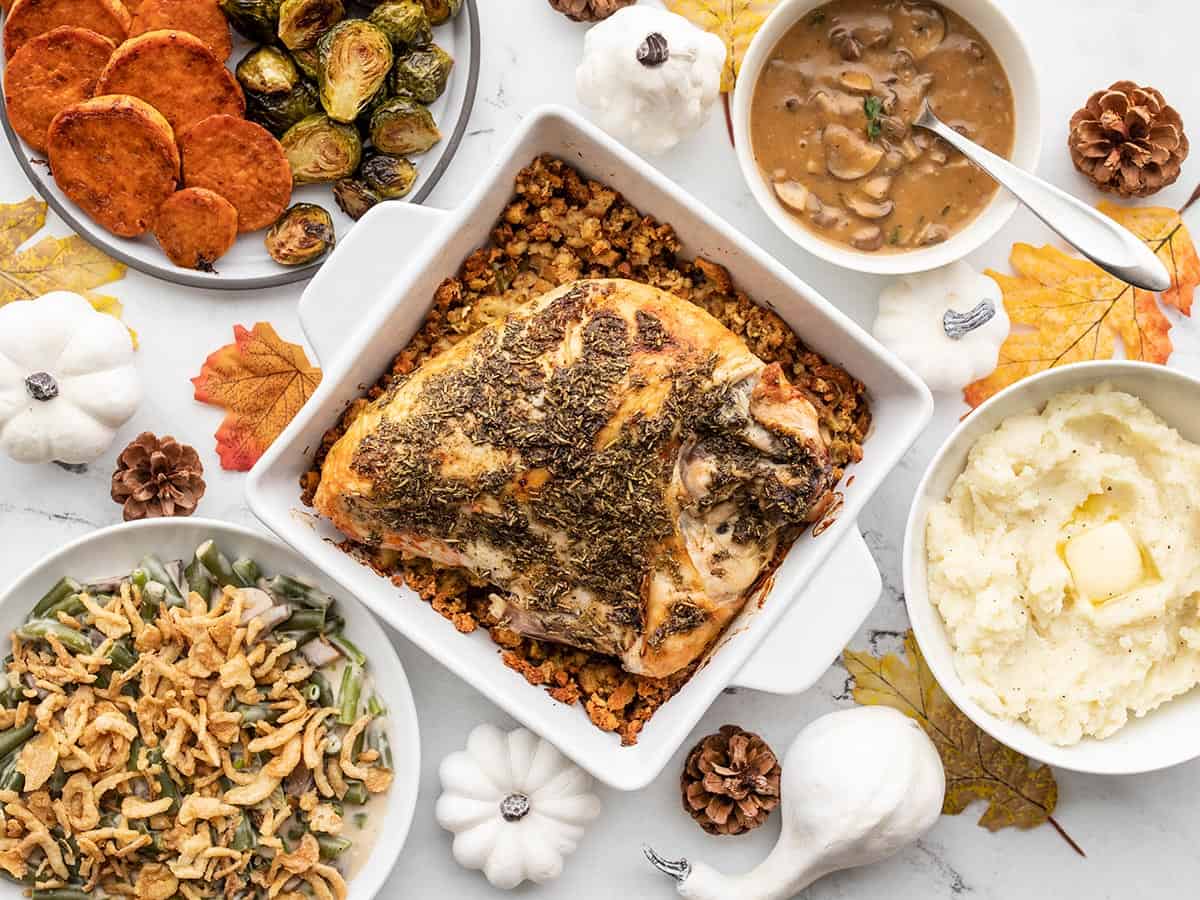
This Thanksgiving Dinner for Two Includes the Following
There are a few classic Thanksgiving recipes that have been scaled down for this smaller Thanksgiving dinner menu:
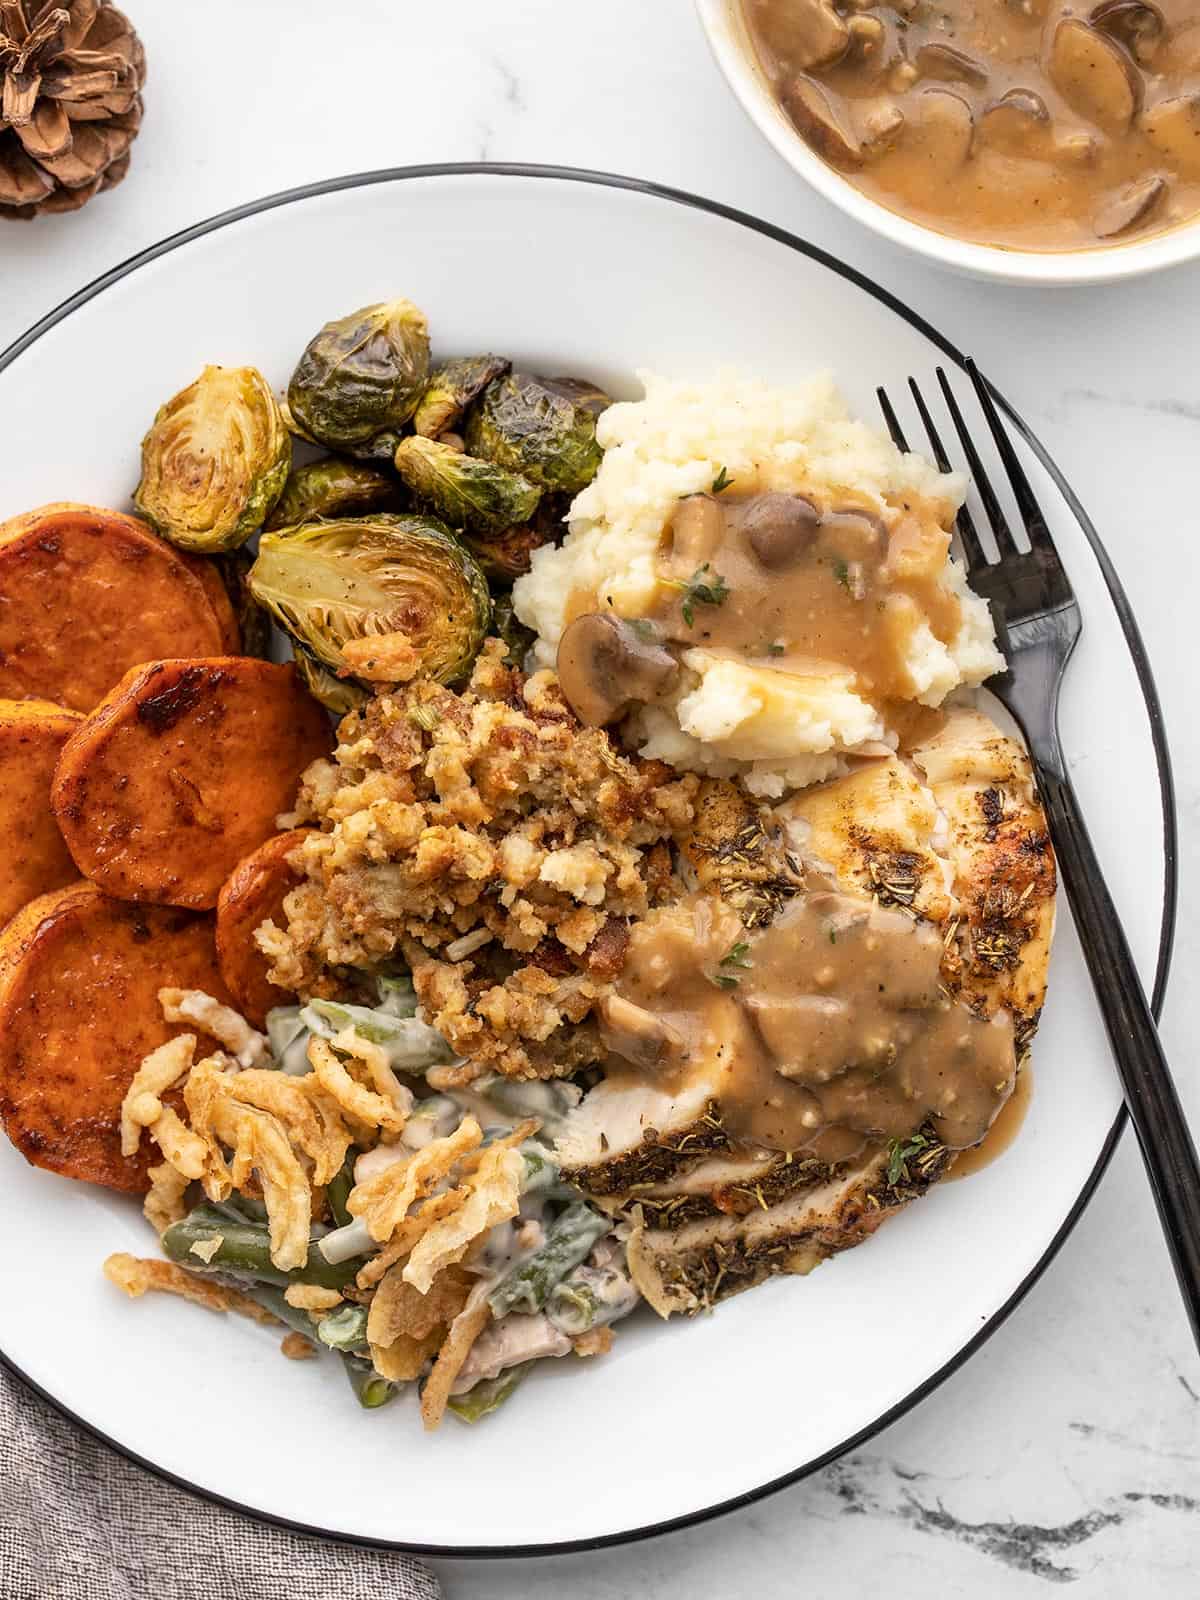
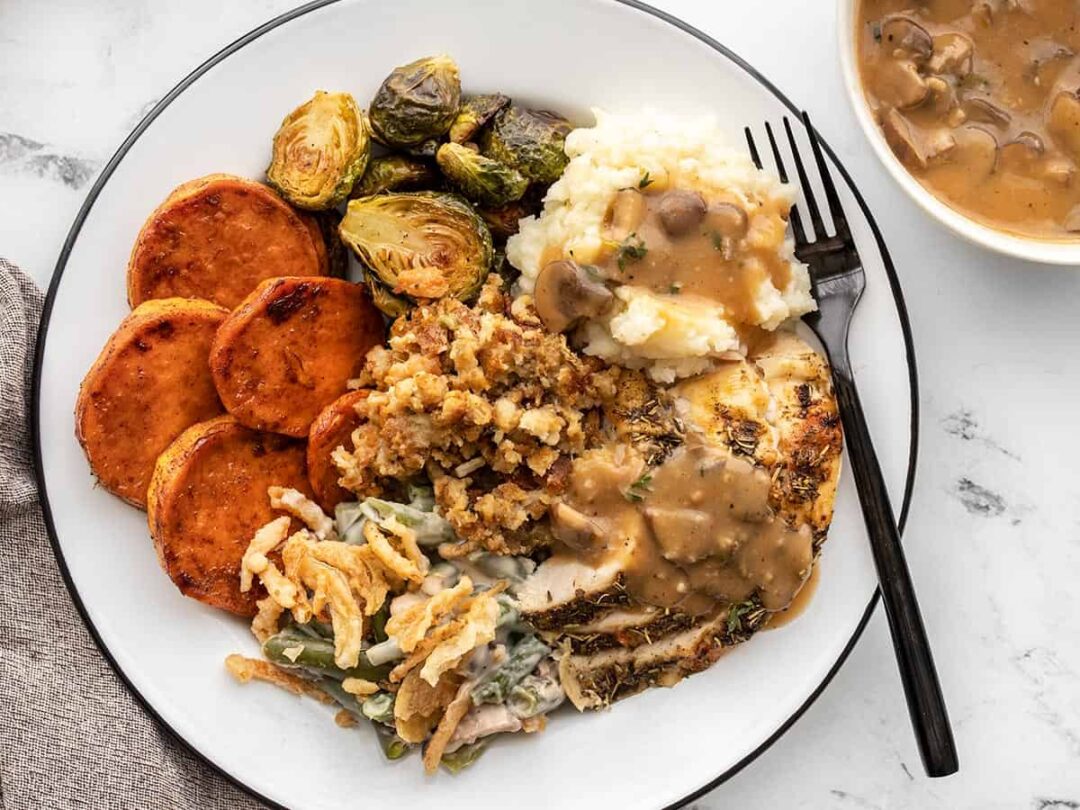
- Roasted Turkey Breast and Stuffing
- Candied Sweet Potatoes
- Roasted Brussels Sprouts
- Mashed Potatoes
- Green Bean “Casserole” (stove top version)
- Mushroom Herb Gravy
We’re all about reducing food waste here at, so each recipe makes about 2-4 servings. That means you’ll still have a little leftover food, but not as much as if you’d prepared a regular-sized Thanksgiving dinner.
During the oven cooking process, three recipes will be prepared simultaneously (at the same time and temperature) and three will be prepared on the stove top while the other recipes are cooking.
You can add some homemade or store-bought extras to the recipes above, in addition to the ones listed above. I would suggest making cranberry sauce or mini pumpkin pies the day before and storing them in an airtight container.
A quick Thanksgiving grazing board might be a good idea to snack on early in the day, or perhaps you could prepare some cranberry cream cheese dip with crackers to go with it. Don’t forget to make a couple of Apple Cider Mimosas to enjoy with your breakfast.
Is It Time-consuming to Prepare?
It took me about two hours to prepare this meal. I prepared the rest of the sides while the turkey and stuffing were roasting for approximately 1.5 hours.
I believe 2-3 hours is reasonable for most people since I am faster than most home cooks and very well accustomed to multi-tasking in the kitchen.
However, I also had to stop and take photographs during that time. If you are a beginner, it may be a good idea to allow for extra time.
NOTE
Taking the time to read through the plan carefully before beginning is the most important part of being able to prepare this meal in a reasonable amount of time.
So you don’t get lost in the process, you should understand how to perform each recipe and in what order before you begin.
Coordination and multitasking skills are required to prepare Thanksgiving dinner, any Thanksgiving dinner.
You’ll need the following
You will need the following equipment to prepare this entire meal:
- 8×8″ casserole dish
- Large baking sheet (about 16″x13″)
- Medium sauce pot (2.5 qt.)
- 3 qt. covered sauté pan or pot
- 10″ skillet
- Chef’s knife
- Cutting board
- Colander
- Mixing bowls
- Measuring cups and spoons
- Whisk
- Parchment paper
You will also need the following ingredients in addition to the equipment listed above:
- 2.5 lbs. bone-in, skin-on turkey breast
- ½ lb. Brussels sprouts
- ¾ lb. sweet potato
- 1 lb. russet potato
- 8 oz. mushrooms
- 12 oz. frozen cut green beans
- 2 cloves garlic
- 1 6oz. box stuffing mix
- 1 Tbsp brown sugar
- 3 ½ Tbsps all-purpose flour
- ½ cup French fried onions (packaged)
- 2 cups vegetable broth
- 1 ¼ cup milk
- 11 Tbsp butter
- 1 ¼ tsp rubbed sage
- 1 tsp dried rosemary
- 1 ⅛ tsp dried thyme
- ¼ tsp garlic powder
- ¼ tsp cinnamon
- ⅛ tsp ground cloves
- Salt, pepper, and olive oil

Step-by-Step Instructions for Making Thanksgiving for Two
It’s time to get started. In the following steps, I am going to explain the process in more detail.
There are several steps in each recipe, so you can skip if you don’t like a particular recipe or even scale up if you’d like more of a certain recipe.
The majority of the dishes here will need to be prepared simultaneously, but they are listed in the order in which they will be prepared. It is important to keep in mind that there will be overlap in the cooking times.
The instructions should be read thoroughly before you begin, so please ensure that you do so. To execute a Thanksgiving dinner successfully, it is crucial that you understand how each recipe is prepared and the sequential steps involved.
NOTE
Your oven racks should be positioned in such a way that the upper rack is slightly above the middle position, and the lower rack is just below the middle position (not the lowest).
Sheet pans only need enough vertical room on the bottom rack, while casserole dishes and turkey breasts need enough height on the top rack.
1. Turkey and Stuffing
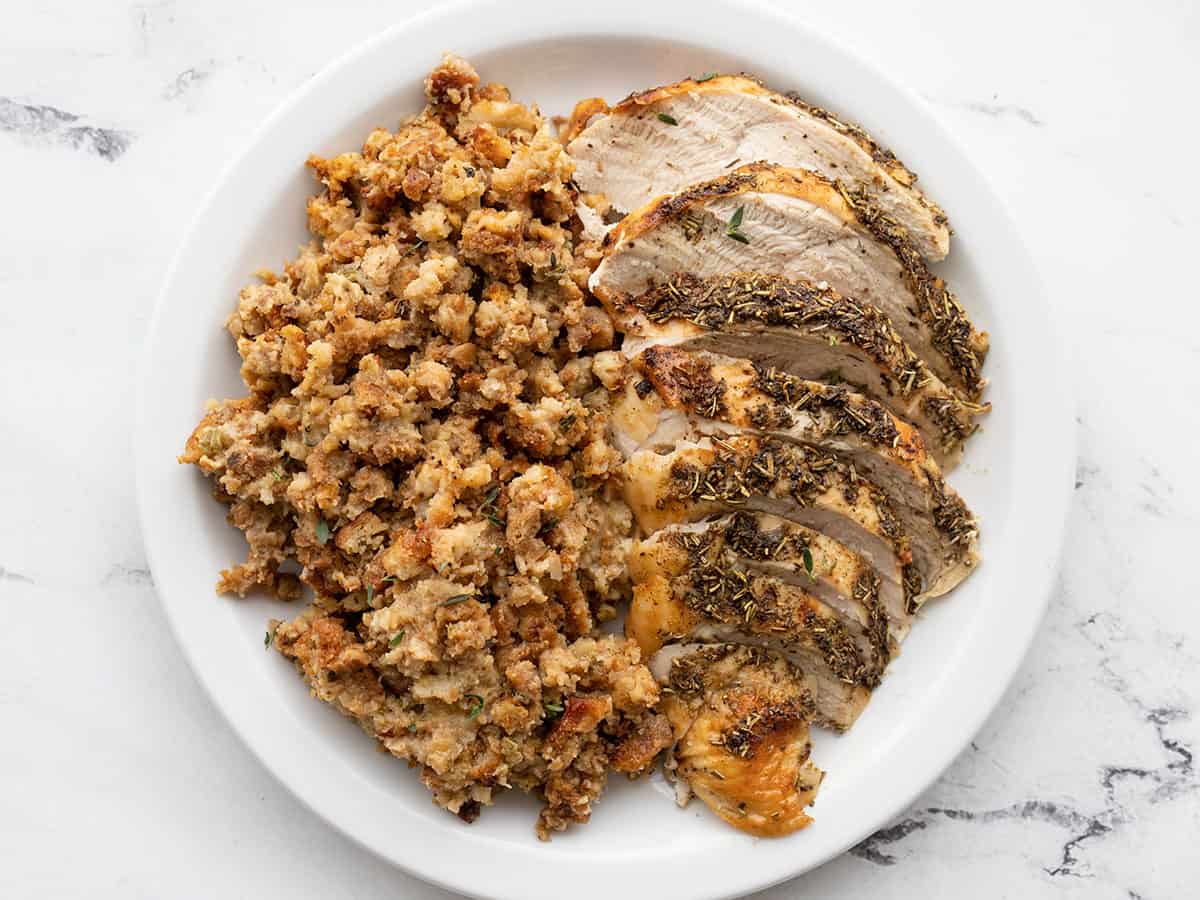
There is nothing better than roasting a whole turkey when it comes to making this turkey so tasty and juicy. Roasted turkey absorbs juices and fat from the stuffing, making it even more delicious.
In order to get the most time from your turkey and stuffing, you’ll want to start cooking them first (about 1.5 hours). During the time the turkey and stuffing are cooking, you can prepare the rest of the sides.
A Roasted Turkey Breast Stuffed with Stuffing
Here are two easy and flavorful Thanksgiving recipes for two: herb-roasted turkey breast with stuffing.
Author: Beth
Prep Time: 10 minutes/ Cook Time: 1hr 30 minutes/ Total Time: 1hr 40 minutes
Servings: 3 to 4
Ingredients
- 1 6oz. box stuffing mix ($0.89)
- 1.5 cups water ($0.00)
- 4 Tbsp butter, room temperature ($0.40)
- 1 tsp dried sage ($0.10)
- 1 tsp dried rosemary ($0.10)
- 1 tsp dried thyme ($0.10)
- 3/4 tsp salt ($0.05)
- 2.5 lb. bone-in, skin on turkey breast ($12.21)
Instructions
- The oven should be preheated to 350 degrees Fahrenheit. Fill a bowl with 1.5 cups of warm water and add the box of stuffing mix. As you prepare the turkey, stir the stuffing and allow it to absorb the water.
- Make a small bowl by mixing butter, sage, rosemary, thyme, and salt at room temperature.
- The herb butter mixture should be applied all over the turkey breast after it has been patted dry.
- In a casserole dish that measures 8 inches by 8 inches, spread the stuffing on the bottom and then top with the turkey breast. You should be able to cover most of the stuffing with the turkey. To prevent the stuffing mix from browning too much in the oven after an hour and a half, use foil to cover the stuffing mix if there is a lot of stuffing that will be exposed.
- Place the turkey and stuffing in the oven (upper rack) and roast for 1.5 hours, or until the internal temperature of the turkey breast reaches 165°F.
- When the turkey and stuffing are done roasting, let them rest for 10-15 minutes before serving. The stuffing underneath the turkey will have absorbed quite a bit of moisture, while the stuffing on the edges will have retained quite a bit of moisture. Rehydrate the drier pieces by stirring the stuffing together and letting it rest for about five minutes.
Nutritional
Serving: 1 serving ・ Calories: 552 kcal ・ Carbohydrates: 33 g ・ Protein: 66 g ・ Fat: 18 g ・ Sodium: 1722 mg ・ Fiber: 1 g
The nutritional values shown here are only estimates. Please see our nutrition disclaimer.
Our equipment section contains affiliate links to products we use and love. As an Amazon Associate, I can earn commissions on qualifying purchases.
Turkey and Stuffing Step by Step Photos
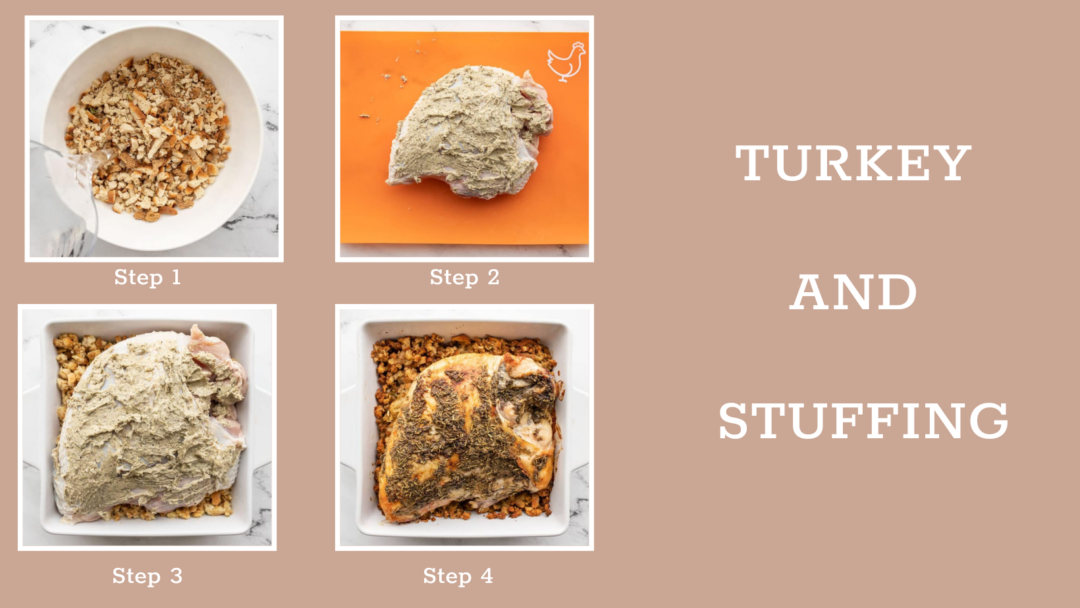
- The oven should be preheated to 350 degrees Fahrenheit. Place the contents of one 6oz bottle in a cup box of stuffing mix in a bowl and add 1.5 cups of warm water. Prepare the turkey while you prepare the dressing, then stir it together and let it soak.
- Combine 4 tablespoons of room temperature butter with 1 tablespoon dried thyme, 1 tablespoon dried rosemary, and 1 tablespoon dried sage. After patting a 2.5 lb bone-in skin-on turkey breast dry, smear the herb butter over its surface (if the turkey breast is damp, the herb butter won’t stick, so dry it well).
- Using an 8×8-inch casserole dish, place the hydrated stuffing mix in the bottom and the turkey breast on top. There should be a large amount of stuffing covered by the turkey. Cover any exposed portions of stuffing with foil to prevent them from browning too much during cooking if there are large portions present. Covering the turkey with foil is not recommended.
- Pre-heat the oven to 350 degrees Fahrenheit and roast the turkey and stuffing for about 1.5 hours, or until the internal temperature reaches 165 degrees. It is best to let the turkey rest for about 10-15 minutes before slicing and serving.
- As the turkey roasts, the stuffing under it will absorb a great deal of moisture, while the stuffing on the outer edges will remain crunchy. The moisture levels in the stuffing should equalize after about five minutes of stirring.
When the turkey is in the oven and the stuffing is ready, proceed to recipe #2, candied sweet potatoes and roasted Brussels sprouts.
2. Candied Sweet Potatoes and Roasted Brussels Sprouts
Prepare the candied sweet potatoes and roasted Brussels sprouts while the turkey and stuffing are roasting. In the oven with the turkey and stuffing, these will all cook together on one sheet pan.
During the last 40 minutes of cooking the turkey, prepare the sweet potatoes and Brussels sprouts on the sheet pan and place them in the oven afterward.
It was all I could do to stop myself from eating the whole batch of candied sweet potatoes.
Roasted Brussels Sprouts and Candied Sweet Potatoes
One sheet pan makes a two-in-one Thanksgiving side dish, combining roasted Brussels sprouts with candied sweet potatoes.
Author: Beth
Prep Time: 10 minutes/ Cook Time: 40 minutes/ Total Time: 50 minutes
Servings: 2
Ingredients
Candied Sweet Potatoes
- 3/4 lb. sweet potato ($0.75)
- 1.5 Tbsp ($0.15)
- 1 Tbsp ($0.04)
- 1/4 cinnamon ($0.02)
- 1/8 tsp ($0.02)
- 1/8 tsp salt ($0.02)
Roasted Brussels Sprouts
- 1/2 lb. Brussels sprouts ($2.00)
- 1 Tbsp olive oil ($0.16)
- 1/8 tsp each salt and pepper ($0.03)
Instructions
- Peel and slice the sweet potatoes into ½-inch thick rounds. Slice the sweet potatoes and place them in a bowl.
- Butter should be melted and then brown sugar, cinnamon, cloves, and salt should be added. The sweet butter should be poured over the sliced sweet potatoes and stirred to incorporate.
- Make sure the Brussels sprouts are dry by removing any dry ends and slicing them in half. Add olive oil, salt, and pepper to the salad, and toss to combine.
- Using parchment paper, cover half of a baking sheet with butter-coated sweet potatoes. Using your hands, spread as much butter mixture on the sweet potatoes as you can. Another half of the baking sheet should be covered with Brussels sprouts.
- Placing the baking sheet below the turkey in the oven will help it cook faster. Depending on their size, sweet potatoes and Brussels sprouts should take about 40 minutes in the oven to brown and become tender. Flip them halfway through.
Nutritional
Serving: 1 serving ・ Calories: 356 kcal ・ Carbohydrates: 51 g ・ Protein: 7 g ・ Fat: 16 g ・ Sodium: 490 mg ・ Fiber: 10 g
The nutritional values shown here are only estimates. Please see our nutrition disclaimer.
Equipment
![]()

Chef’s Knife Parchment Paper Enamelware Sheet Pan
Our equipment section contains affiliate links to products we use and love. As an Amazon Associate, I can earn commissions on qualifying purchases.
Candied Sweet Potatoes and Roasted Brussels Sprouts Step by Step Photos
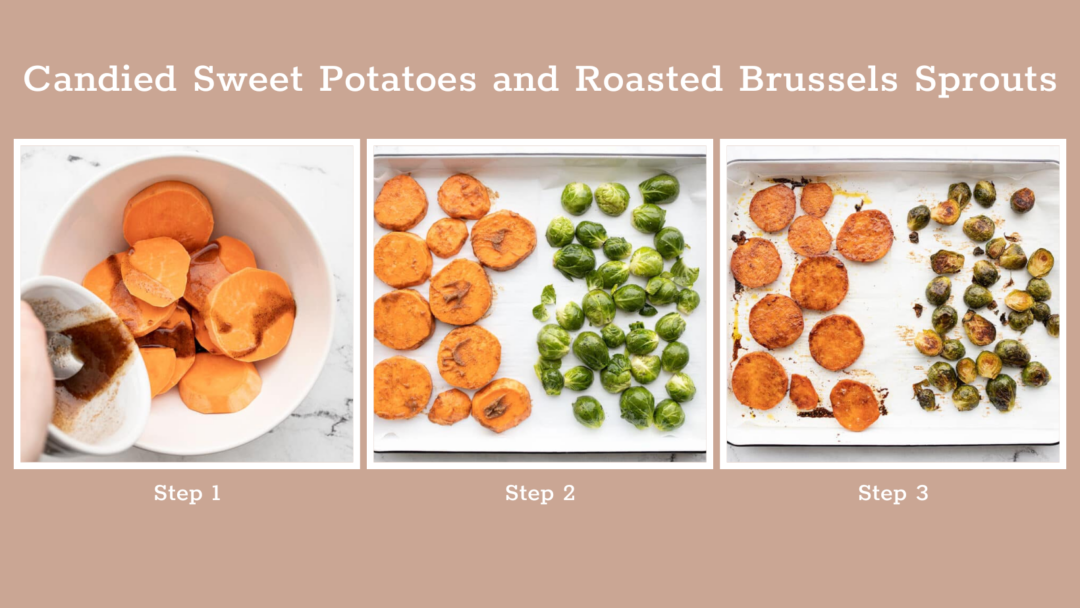
- Peel and slice one ¾ lb. sweet potato into ½-inch thick rounds. Melt 1.5 tablespoons of butter, add 1 tablespoon brown sugar, ¼ teaspoon cinnamon, 1 teaspoon ground cloves, and ⅛ teaspoon salt. The butter mixture should be poured over the sweet potatoes and stirred until the potatoes are well coated.
- Brussels sprouts weighing ½ pounds should be cut in half after trimming the stems. You can add 1 tablespoon of olive oil as well as ⅛ teaspoons of salt and pepper, and toss this mixture together to coat. It is recommended to place the Brussels sprouts and sweet potatoes on a baking sheet that has been lined with parchment paper. In order to get all of that butter mixture onto the sweet potatoes, make sure to transfer it from the bowl as much as you can.
- To avoid overcooking the vegetables, you may want to leave them prepped on the sheet pan until just before the turkey goes into the oven, so that they don’t burn. Cook the vegetables on the baking sheet for about 40 minutes (lower rack), flipping halfway through to ensure even browning and tenderness.
The next recipe, mashed potatoes, can be prepared after the sweet potatoes and Brussels sprouts are prepared on the sheet pan and ready to be baked. In the meantime, prepare green bean “casserole” and mushroom herb gravy while the sweet potatoes and Brussels sprouts are roasting.
3. Mashed Potatoes
When you are preparing the sweet potatoes and Brussels sprouts, you can prepare the mashed potatoes. After preparing them, you can leave them on the stovetop with a lid on to keep warm while you finish the rest of the side dishes.
Feel free to stir in other ingredients, like sour cream, cheese, or herbs, at the end of the recipe if you want to add them to your mashed potatoes.
Small-Batch Mashed Potatoes
You can make this smaller batch of mashed potatoes for a Thanksgiving for Two or for any quick weeknight dinner when leftovers aren’t an issue.
Author: Beth
Prep Time: 15 minutes/ Cook Time: 15 minutes/ Total: 30 minutes
Servings: 3 ¾ cup each
Ingredients
- 1 lb. russet potato ($0.99)
- 3/4 salt, divided ($0.02)
- 1/4 cup milk ($0.11)
- 2 Tbsp butter ($0.20)
- 1/4 tsp garlic powder ($0.02)
- 1/8 tsp pepper($0.01)>
Instructions
- Potatoes should be peeled and diced into ½-inch cubes. Remove excess starch from the diced potatoes by rinsing them with cool water in a colander.
- A medium pot should be filled one inch with water after placing the cubed potatoes in it. Add ½ tsp salt. Over high heat, cover the pot and bring the water to a boil. The potatoes should be boiled for 8-10 minutes, or until they are very tender.
- Once the potatoes have been drained, give them another brief rinse in a colander.
- To the pot where the potatoes are being boiled, add the butter, milk, garlic powder, and pepper. Stir the milk and butter together over low heat until they are hot and melted. Once the potatoes have been drained, return them to the pot and mash them. If necessary, add salt to the mashed potatoes (I added ¼ teaspoons).
- Cover the pot and move it to a back burner (not turned on) to stay warm while you prepare the remaining sides.Place a lid on the pot then move it to a back burner (not turned on) to stay warm while you prepare the rest of the sides.
Nutritional
Serving: 0.75 cup ・ Calories: 133 kcal ・ Carbohydrates: 29 g ・ Protein: 4 g ・ Fat: 1 g ・ Sodium: 598 mg ・ Fiber: 2 g
The nutritional values shown here are only estimates. Please see our nutrition disclaimer.
Equipment
Our equipment section contains affiliate links to products we use and love. As an Amazon Associate, I can earn commissions on qualifying purchases.
Small Batch Mashed Potatoes Step by Step Photos
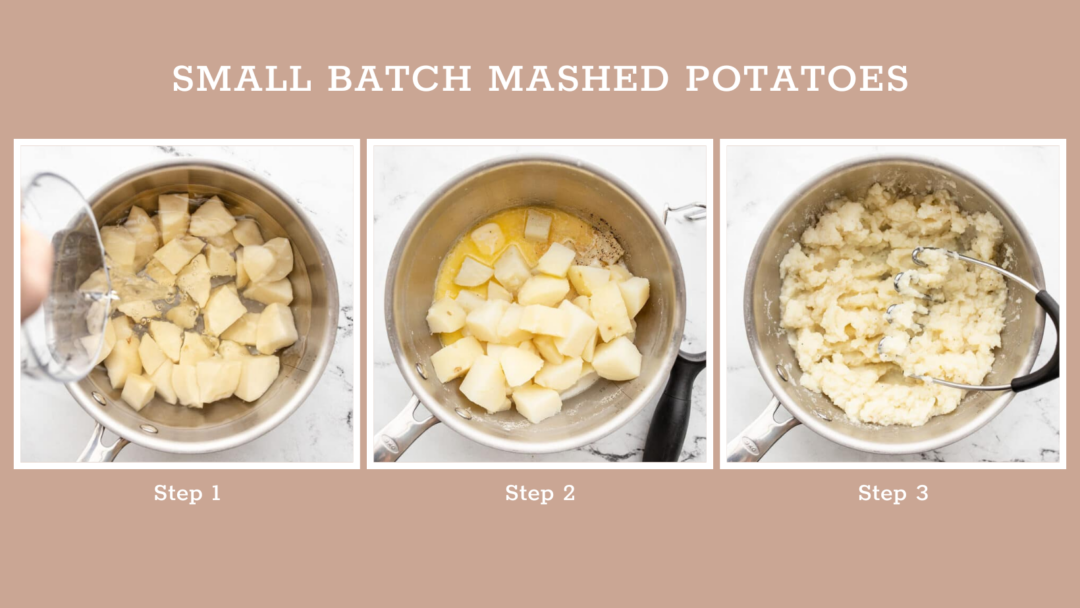
- One pound of russet potatoes should be peeled and diced into 12-inch pieces. After rinsing the pieces in a colander for a couple of minutes, remove the excess starch by squeezing them tight. Using a medium pot, cover the cubed potato with water and place it in the oven for about one hour. The water should be seasoned with half a teaspoon of salt. A lid should be placed on top of the pot and the water should be brought to a boil on high heat with a lid on top. In order to make the potatoes very tender, they should be boiled for 8-10 minutes. In a colander, drain the potatoes and give them a quick rinse again before draining them again in a colander.
- Add 2 Tbsp butter, ¼ cup milk, and ¼ tsp garlic powder, and ⅛ tsp pepper to the pot used to boil the potatoes. The milk and butter mixture should be heated until the milk is hot and the butter has mostly melted. The drained potatoes should be added back to the pot after they have been drained.
- Using a potato masher, mash the potatoes until smooth. Taste and add salt if needed (I added ¼ tsp). Keep the potatoes warm on an unused burner (heat turned off) until the rest of the meal is ready by covering the pot with a lid.
4. Green Bean “Casserole”
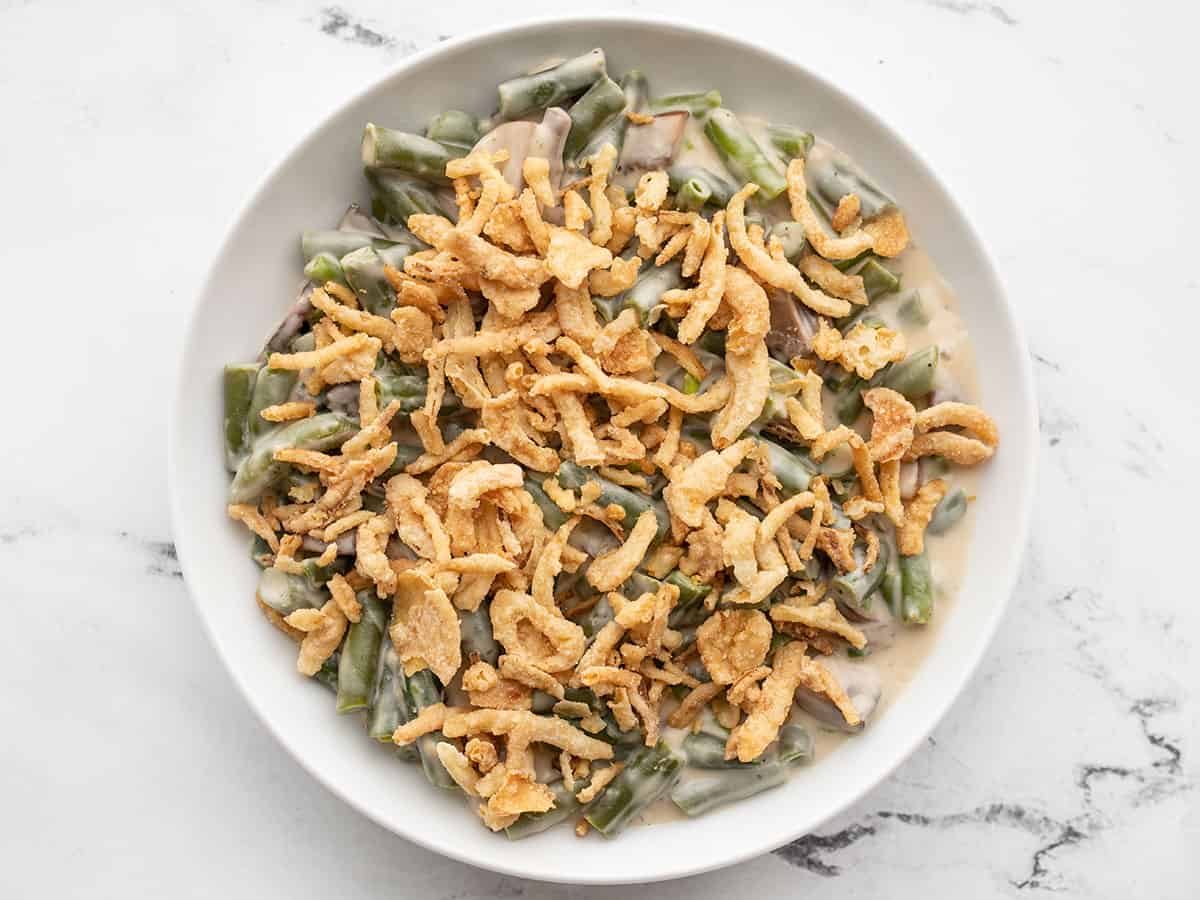
After your potatoes are mashed and resting on the back of the stove, begin preparing your green bean casserole. This recipe basically resembles the classic baked casserole but cooks on the stovetop. A creamy mushroom sauce is poured over tender green beans and topped with French fried onions. If you prefer, you can bake this after you assemble it, but I intended this recipe to be quick and simple, so I skipped the baking step.
Stove Top Green Bean “Casserole”
Here’s a quick and easy version of baked green beans casserole you can make on the stovetop. Creamy mushroom sauce and French-fried onions top tender green beans.
Author: Beth
Prep Time: 5 minutes/ Cook Time: 15 minutes/ Total Time: 20 minutes
Servings: 3 ¾ cup each
Ingredients
- 12 oz. frozen cut green beans ($1.00)
- 2 Tbsp butter ($0.20)
- 4 oz. mushrooms ($0.75)
- 1 garlic ($0.08)
- 2 all-purpose flour ($0.02)
- 1 cup milk ($0.44)
- 1 cup vegetable broth ($0.13)
- 1/4 tsp salt ($0.02)
- 1/4 pepper ($0.03)
- 1/2 cup Fried Onions ($0.32)
Instructions
- The frozen green beans should be placed in a pot with water and covered. Using a high heat setting, bring the water to a boil under a lid. Drain the green beans in a colander after boiling for about 5 minutes, or until tender.
- Slice the mushrooms and mince the garlic while the green beans are boiling.
- To the pot in which you boiled the green beans, add the mushrooms, garlic, and butter. In a medium saucepan, sauté the vegetables. Stir the flour into the mushroom mixture and continue to cook for approximately one minute after the mushrooms have released all their water.
- Salt, pepper, milk, and vegetable broth should be whisked together. All the flour should be dissolved off the bottom of the pot after whisking. Reheat the milk mixture, stirring occasionally, until it reaches a rolling boil. The sauce will thicken once it reaches a boil.
- After draining the green beans, add them to the sauce pot and stir well. As you make the final recipe (mushroom herb gravy), reduce the heat to its lowest setting and continue heating the green beans over low, stirring occasionally. Slowly heating the sauce will result in it thickening.
- Transfer the green beans to a bowl and top with the fried onions when ready to serve.
Nutritional
Serving: 0.75 cup ・ Calories: 242 kcal ・ Carbohydrates: 22 g ・ Protein: 6 g ・ Fat: 15 g ・ Sodium: 695 mg ・ Fiber: 4 g
The nutritional values shown here are only estimates. Please see our nutrition disclaimer.
Equipment

Our equipment section contains affiliate links to products we use and love. As an Amazon Associate, I can earn commissions on qualifying purchases.
Stove Top Green Bean Casserole Step by Step Photos
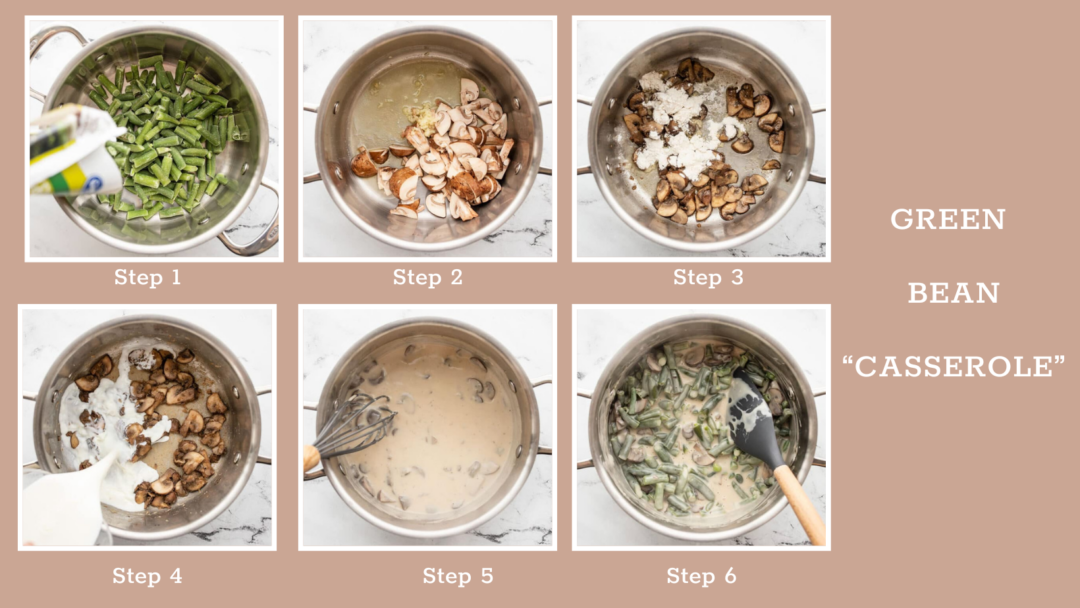
- Fill a pot with water and add 12 ounces of frozen green beans. Bring the water to a boil by covering the pot with a lid and turning the heat to high. It takes about five minutes to boil the green beans until they are tender. Place the green beans in a colander and drain them.
- When the beans are cooking, slice 4 ounces of mushrooms and mince one clove of garlic. To the pot that was used to boil the beans (after draining them), add the mushrooms, garlic, and two tablespoons of butter. Sauté the mushrooms until they have released all of their water and the liquid has evaporated.
- In the last minute of cooking, add 2 tablespoons of all-purpose flour to the pot and stir over medium heat until there is no more water pooling at the bottom.
- Pour in one cup of milk, one cup of vegetable broth, and ¼ teaspoons of salt and pepper. Whisk the flour until it is completely dissolved off the bottom of the pot.
- At this point, the liquid will thicken to a sauce when it returns to a boil, stirring occasionally.
- Pour the sauce back over the green beans after they have been drained. As you make the final recipe (mushroom herb gravy), turn the heat down low and let the green beans heat over low, stirring occasionally. Add ½ cups of fried onions at the end of the cooking process.
5. Mushroom Herb Gravy
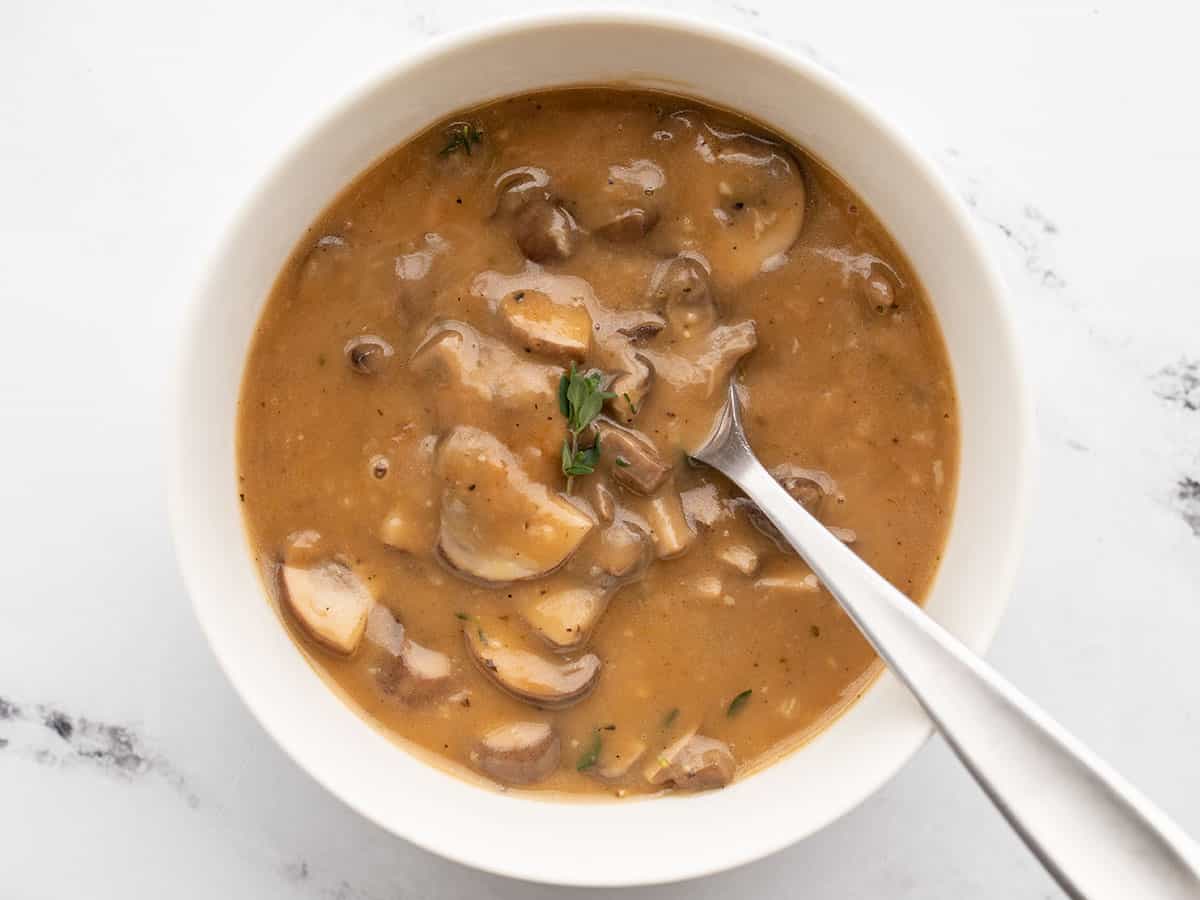
You should make this mushroom herb gravy just before serving your Thanksgiving dinner, since it only takes a few minutes to prepare. After your gravy begins to cool, it tends to thicken even more, so if it becomes too thick, stir in a tablespoon or two of warm water to loosen it.
Mushroom Herb Gravy
With just a few minutes of preparation, this mushroom herb gravy is full of delicious savory flavors.
Author: Beth
Prep Time: 5 minutes/ Cook Time: 10 minutes/ Total Time: 15 minutes
Servings: 3 ½ cup each
Ingredients
- 4 oz. mushrooms ($0.75)
- 1 clove garlic ($0.08)
- 1.5 butter ($0.15)
- 1.5 Tbsp all-purpose flour ($0.02)
- 1 cup vegetable broth ($0.13)
- 1/4 tsp rubbed sage ($0.03)
- 1/8 tsp dried thyme (or one sprig fresh) ($0.03)
- 1/8 tsp pepper ($0.02)
Instructions
- The mushrooms should be sliced and the garlic should be minced. A small skillet can be used for the mushrooms, garlic, and butter. Place the mushrooms, garlic, and butter into the skillet and sauté over medium heat until all of the water is absorbed by the mushrooms and the water has completely evaporated off the bottom.
- Continue stirring and cooking for about a minute more after the water has gone from the bottom of the skillet.
- Adding the vegetable broth and whisking well until all of the flour has dissolved off the bottom of the skillet is the final step. Pepper, sage, and thyme can also be added. Cook the broth, stirring occasionally, until it thickens into gravy, and then remove it from the heat.
- Add salt to the gravy if necessary based on the taste of the gravy. The food should be served as soon as possible.
To loosen up the gravy, whisk a tablespoon of water into it until smooth if it becomes too thick as it cools.
Nutritional
Serving: 0.5 cup ・ Calories: 78 kcal ・ Carbohydrates: 6 g ・ Protein: 2 g ・ Fat: 6 g ・ Sodium: 365 mg ・ Fiber: 1 g
The nutritional values shown here are only estimates. Please see our nutrition disclaimer.
Equipment

Our equipment section contains affiliate links to products we use and love. As an Amazon Associate, I can earn commissions on qualifying purchases.
Mushroom Herb Gravy Step by Step Photos
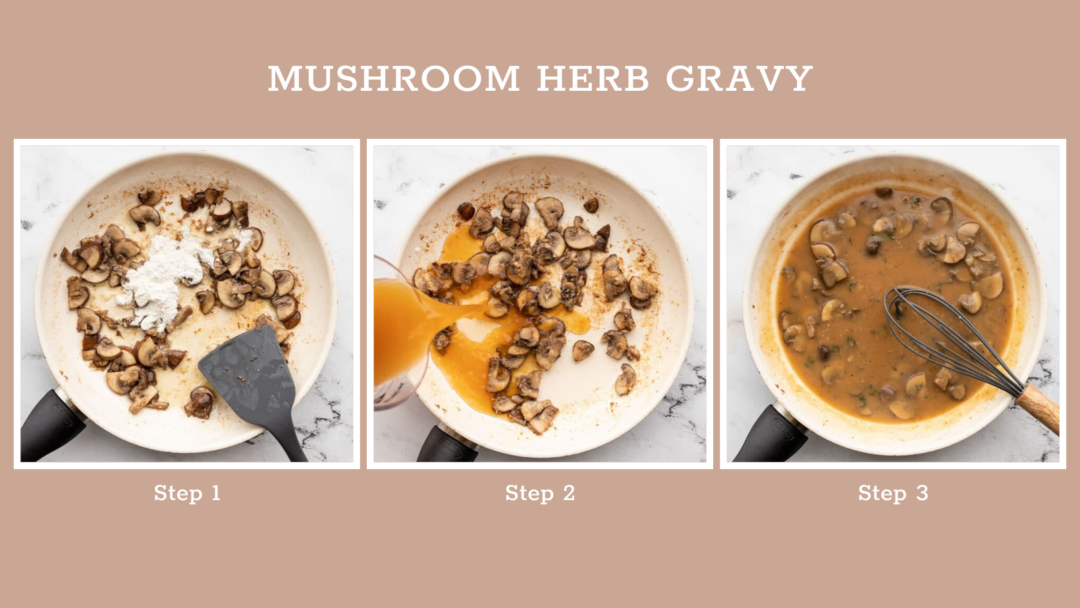
- As with the green bean casserole, the gravy begins the same way. A clove of garlic and four ounces of mushrooms should be sliced and minced. Stir the mushrooms and garlic in 1.5 tablespoons butter until all the moisture has been released from the mushrooms and evaporated off the bottom of the pan. Adding 1.5 Tbsp flour to the skillet after water has evaporated will give the sauce a richer flavor. Stir and cook for about a minute.
- Whisk in 1 cup vegetable broth. The flour must be whisked until it has dissolved completely off the bottom of the skillet. Also add ¼ tsp rubbed sage, ⅛ tsp dried thyme, and ⅛ tsp pepper.
- When the broth reaches a simmer, stir it occasionally to make sure it doesn’t burn. A gravy will be formed once it begins to simmer and thickens as it simmers. You may need to add salt if you feel it is necessary. The dish should be served as soon as possible.
This is what you need to know. You should be able to serve the rest of the dishes after you’ve finished making the gravy. Two people should be able to enjoy generous helpings of this meal, plus a little left over the next day.
We’d love to see a photo of your dish if you make it. Tag us on social media. Here is your masterpiece, I want to see it.